When the Vinotag® application is open, the following menu is visible at the bottom of your screen:

- MY CELLAR : this tab allows you to view your wine cellar(s). The cellar can be viewed in list mode or in graphic mode. The mode setting is accessible via the icon located at the top right of your screen.
- MY WINES: This tab allows you to consult your wine library, i.e. all the past, present and future wines that you have scanned.
- ALERTS: This tab allows you to consult all the alerts related to your cellar. If you have several wineries registered, you can filter the alerts by winery by clicking on the top right of your screen.
- PROFILE: Allows you to complete and view the information related to your account. You have access to your cellars (add, delete, configure), your invitations, the PREMIUM option, the contact form and all our general conditions.
Use your cell phone to connect the cellar to a WIFI network.
Open the Vinotag application and create a digital cellar by selecting: “Connected Cellar” and choose the reference of your MILLÉSIME cellar from the list.
If you already have a Vinotag account, go to the “MY ACCOUNT” section and click on “ADD A CELLAR” by selecting “Connected Cellar” and choose the reference of your MILLÉSIME cellar from the list.
The application will connect to your physical cellar, which must be powered by a mains socket and correctly installed (refer to the installation instructions for your cellar). Once your cellar is detected by the application, the available WIFI networks are displayed, select the WIFI network of your choice, or indicate the name of your WIFI network if it is not automatically displayed and enter the access code (network password) to connect your cellar to the network and adjust its settings remotely.
The “WIFI” icon on the cellar is displayed steadily, indicating that the WIFI function is on and the cellar is connected to the WIFI.
If the “WIFI” icon is flashing, it means that the WIFI function is on but the cellar cannot connect to the WIFI network. Please reset the cellar’s WIFI.
To reset the WIFI in case of connection problem or change of internet box, press simultaneously the “cadena” and “SET” keys on the control panel for 5 seconds. This process deletes the original WIFI information and allows you to reconnect to the network of your choice. The “WIFI” icon on the control panel screen indicates that the WIFI function is off.
MILLÉSIME wine cellars can be controlled remotely, to use this feature you must connect the cellar to a WIFI network. When the WIFI icon on the screen is blinking, the cellar is searching for the network. Make sure that the Bluetooth of your phone is activated and open the Vinotag® application then go to the tab: “MY ACCOUNT” then: “ADD A CONNECTED WINE CELLAR”;
Follow the different steps and enter the Name of the Wifi network and its password.
As soon as it is created, you can modify it to have a different configuration than the default one. You can always configure it later.
You can switch from one cellar to another via the drop-down menu that appears when you click on the name of your cellar located at the top left of your screen on the tab “CAVES”.
MILLÉSIME cellars allow you to control certain parameters of your cellar remotely from the VINOTAG application. To access these parameters, your cellar must be connected to a WIFI network. Once the cellar is connected, open the Vinotag® application and go to the “My cellar” tab and click on the “Settings” icon located on the top left of the screen. This will take you to the “Settings” menu, where you can turn your cellar on or off from your phone.
The Millésime cellars allow you to control certain parameters of your cellar remotely from the VINOTAG application. To access these parameters, your cellar must be connected to a WIFI network. Once the cellar is connected, open the Vinotag® application and go to the “My cellar” tab and click on the “Settings” icon located at the top left of the screen. By default, the light will be automatically turned on each time the door is opened. 2 lighting modes are available:
1. Automatic mode: The light turns on when the door is opened, and turns off automatically after 15 minutes.
2. Permanent mode: The light turns on or off only when commanded by pressing the switch in your VINOTAG® app.
MILLÉSIME cellars allow you to control certain parameters of your cellar remotely from the VINOTAG application. To access these parameters, your cellar must be connected to a WIFI network. Once the cellar is connected, open the Vinotag® application and go to the “My cellar” tab and click on the “Settings” icon located on the top left of the screen. This will take you to the temperature setting. The ” + ” and ” – ” buttons allow you to adjust the temperature of your cellar. The drop-down menu on the right of the temperature setting allows you to select the temperature unit in Fahrenheit ” °F ” and Celsius ” °C “.
MILLÉSIME cellars allow you to control certain parameters of your cellar remotely from the VINOTAG application. To access these settings, your cellar must be connected to a WIFI network. Once the cellar is connected, open the Vinotag® application and go to the “My cellar” tab and click on the “Settings” icon located on the top left of the screen. This will take you to the “Sound alarms” menu, you can activate or deactivate the sound alarms from your phone.
Vinotag® alerts can be of different types:
- Technical alerts: these alerts indicate a technical problem or an action carried out in the cellar: bottle consumed; bottle added; cellar created; cellar joined; user X has joined your cellar… In the case of a technical problem, contact an authorized technician. The alerts are presented in the form of a list indicating the type of alert, the date, the time, the number of the rack concerned and the name of the cellar concerned.
- Filter change alert: If your cellar is equipped with a carbon filter, the application alerts you when it is necessary to change the filter. The filter change date is automatically set when you register a new cellar. Attention, when you change the filter of your cellar, don’t forget to fill in this action in the Vinotag® application, go to the tab “My cellar” and click on the icon “Settings” located on the top left of the screen. Click on the button “Charcoal filter status” so that the counter resets to the current date (by default, a filter change must be done every year)
- Stock alert: you can program stock alerts on a specific wine and a defined quantity. To program a stock alert, open the Vinotag® application and select the wine on which you want to program an alert. Once you are on the file of your wine, you can click on “MODIFY ALERT”. Then indicate from how many bottles left you want to receive this alert by clicking on “+” or “-” in the window that opened. Validate.
From now on, the application will alert you that your wine is about to run out.From now on, the application will alert you that your wine is about to run out.
- Peak date alert: you can program peak date alerts on a specific wine and according to the guards you have entered. When adding a bottle to your cellar, you create a wine file. This wine card (filled manually or pre-filled thanks to the Vivino scan) can be customized. You can therefore decide on the minimum and maximum storage time for each of your wines. When you enter these storage times, you automatically program an alert. The Vinotag® application will inform you as soon as your wine exceeds its minimum ageing time to warn you that it can now be consumed. You will also receive a notification if, on the contrary, your wine has exceeded its maximum storage time.
If your wine file is already created, you can always modify it by clicking on the icon to indicate the storage time for your wine.
Be careful, to receive this alert, the storage time must be greater than zero (0), otherwise no alert will be sent. The year of the wine must also be indicated on the file.
If your cellar is empty, you will not be able to view it; it is necessary to add bottles to access your cellar view.
The cellar can be viewed in list mode or in graphic mode. The mode setting is accessible via the icon at the top right of your screen.
If you have more than one cellar, you can switch from one cellar to another via the drop-down menu that appears when you click on the name of your cellar at the top left of your screen.
- The graphic view of your cellar allows you to clearly visualize the contents of your cellar and shelf by shelf.
The size of the dots is an indication of the location of your bottles. Small dots mean that your bottle is located on the back of the rack, i.e., towards the bottom of the cellar. Conversely, a large dot means that your bottle is located at the front of the rack, i.e. on the door side.
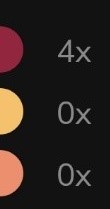
- Red sticker : indicates a red wine and the number of bottles of this color
Yellow sticker : indicates a white wine and the number of bottles of this color
Pink dot : indicates a rosé wine and the number of bottles of this color
Thus, in the example below:
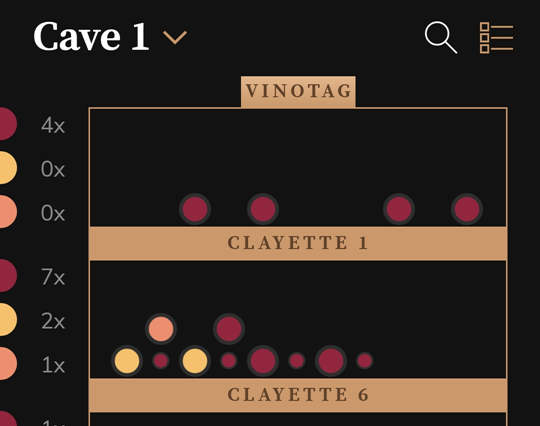
- two white wines are located at the back of rack 3, on the first level;
- your bottle of rosé is also at the back of rack 3 but on the superimposed level, i.e. on your two white wines;
- your bottle of red wine, between your white wines, is located at the front of rack 6, on the first level.
Attention: by default, the first bottle at the back of the rack on the left is the bottle closest to the left wall.
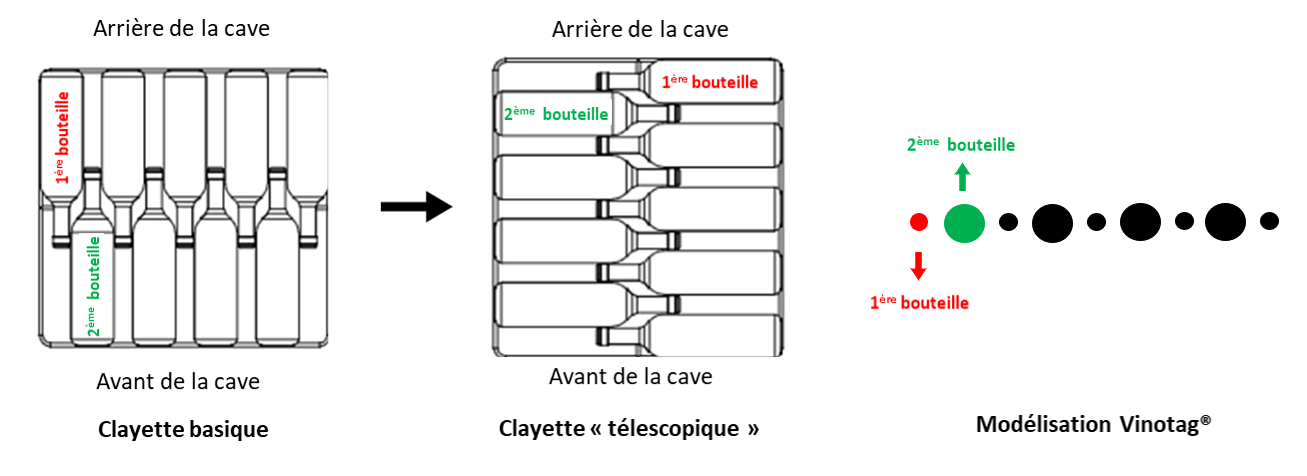
- If you have a cellar with shelves called “telescopic shelves with lateral storage” it means that the position of your bottles is lateral and allows you to see the labels of your bottles. The bottles are therefore placed in your physical cellar on the right and left of the rack and not on the front and back as on a basic rack.
On your graphic view, the first bottle at the back of the rack on the far left corresponds to the bottle closest to the bottom of your cellar, head to the right. The large dots will always represent your left bottles and the small dots your right bottles.
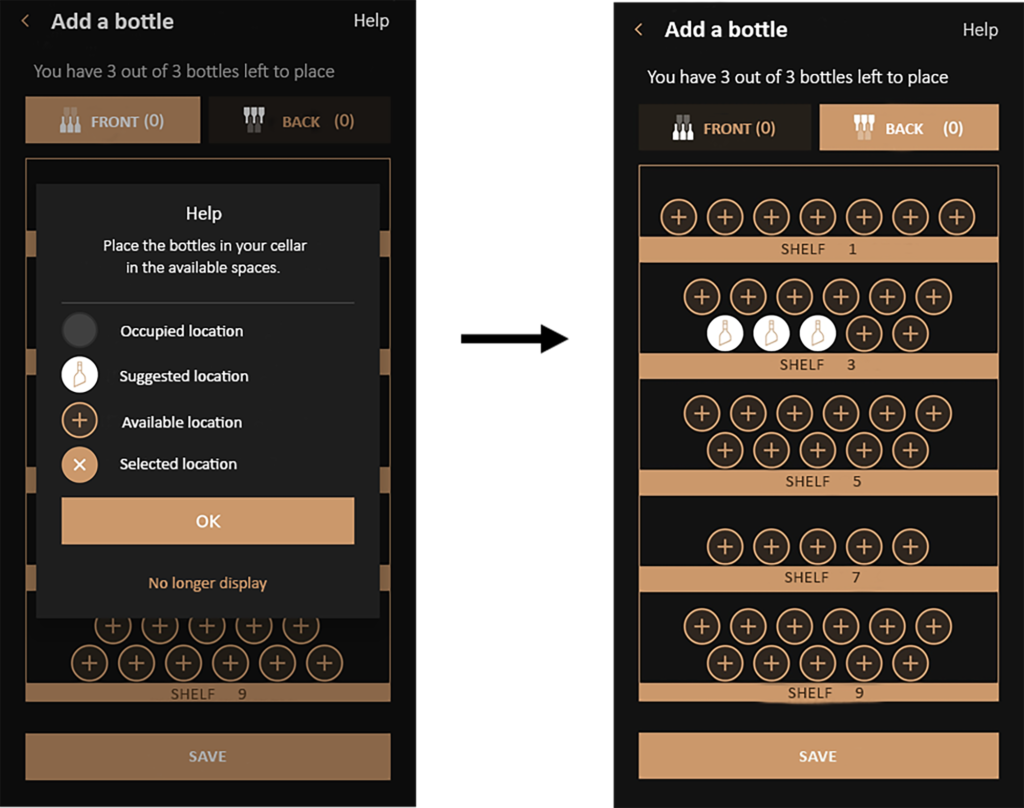
Open the Vinotag® application and add a bottle by clicking on the “+” icon located at the bottom right of your screen. Follow the procedure to add a bottle and take a picture of the label of your bottle. You will then have access to a pre-filled wine file from the Vivino® database. Customize your wine card or use it as is. Place your bottle(s) directly in your physical cellar and then transfer its location to your virtual cellar using its model.
You can also add a bottle from your wine list or from your wine library. Select the desired wine in your list, and click on “ADD ONE OR MORE BOTTLES”.
Choose the cellar in which you add the bottle (if you have several cellars), the quantity of bottles and validate. You will be offered free spaces.
You can either search from the list of wines in a cellar or from your wine library (i.e. all your cellars)
- To search from your cellar, open the Vinotag® application and select the bottle you are looking for from your digital cellar list or search with the search bar by selecting the cellar you are searching from.
Click on the bottle of your choice and then on “POSITION IN THE CELLAR”. You arrive on the graphic representation of your cellar, and the bottle you are looking for is indicated by a colored dot to show its location.
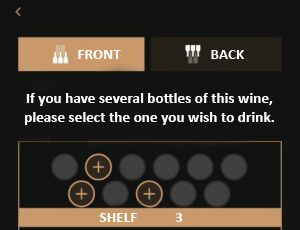
If you wish to consume this bottle, click on “I CONSUMED THIS BOTTLE”.
You arrive on the graphic representation of your cellar. The bottle(s) of this wine are indicated by a highlighted dot. Select the bottle you wish to remove.
- To search from your wine library, open the Vinotag® application and select the bottle you are looking for from the list of your wine library and click on the bottle of your choice and then on “SEE MY BOTTLES”. You have then a list by cellar (if you have several) with the information on which shelf this bottle is positioned.
Choose the bottle you wish to consume. You can directly remove your bottle by clicking on “I CONSUMED THIS BOTTLE” and/or check its location by clicking on “POSITION IN THE CELLAR” to see the location of your wine in the modeling function. ![]()

Open the Vinotag® application and add a bottle by clicking on the “+” icon located at the bottom right of your screen. Follow the procedure to add a bottle and take a picture of the label of your bottle. You will then have access to a pre-filled wine file from the Vivino® database. Customize your wine card or use it as is. Or add a bottle from your wine list or wine library, by selecting the desired bottle, and clicking “ADD ONE OR MORE BOTTLES”.
You will be taken to the schematic view of your cellar. A white dot will show you the available storage locations that are suitable for the aging of your wine. Click on the dot to indicate that this is the location of your bottle and place it in your physical cellar at the location you have just validated.
Open the Vinotag® application and go to the view of the cellar you want to share, then click on the settings icon at the top right of your screen and then on “Share my cellar”.
Click on “Create a code” to generate an invitation code. This invitation code gives access to your digital wine cellar, once it has been shared with the people you want. Send it easily using the “Send” icon next to the code.
Once transmitted, your guest will receive an email, text message or other message (depending on your transmission method), inviting them to create a Vinotag® account or log in to view and consult the contents of your cellar.Click on “Create a code” to generate an invitation code. This invitation code gives access to your digital wine cellar once it has been shared with the people you want. Transmit it easily thanks to the “Send” icon located next to the code.
Once transmitted, your guest will receive an email, sms or other (depending on your sending method), inviting him/her to create a Vinotag® account or to log in to view and consult the content of your cellar.
It is possible, especially when you share your cellar with other people with different types of phones (IOS/ANDROID) that you do not see the changes made by the people who have access to your digital cellar. If you cannot see the changes made by other people who have access to your cellar, close and reopen the application; the update is made every time you launch the application.
You have just been invited to join a Vinotag® digital wine cellar.
– Download the application and create a Vinotag® account. When you first log in, the home page will ask you to create a wine cellar or to join one. Click on “Join a cellar” and enter the invitation code you received. You now have access to a shared wine cellar. Check its contents in the “MY CELLAR” section.
– If you already have a Vinotag® account, open the application and go to the “Profile” tab at the bottom right of the screen. Click on “ENTER INVITATION CODE”. Fill in the code you received and click on “Join”. You now have access to a shared wine cellar. Consult its contents in the “MY CELLAR” section.
You can click on “Leave this cellar” at any time to stop viewing its contents.
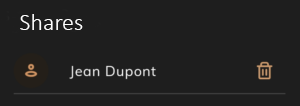
Open the Vinotag® application and go to the “Profile” tab at the bottom right of the screen. Click on “MY CELLARS” and select the cellar for which you want to delete a shared access. Once you have selected the cellar, click on “Share my cellar” and you will have access to the list of people who already have access to your cellar. From this list, simply click on the “trash can” icon on the right of your screen, next to each email address to delete a share.
Your bottles can only be moved from the model.
Open the Vinotag® application and select the bottle you are looking for from your digital cellar. From the model, click directly on the shelf where the bottle to be moved is located. You will access level 1 and 2 as well as the front and back of the rack. Long press on the bottle to be moved. Click on “MOVE BOTTLE”. You can now move it to an available location on the same rack or to another level by clicking on the top left to return to the general view. Select the desired shelf and place your bottle.
Be careful, don’t forget to physically move your bottle at the risk of distorting the modeling of your physical cellar.
When you first set up your digital wine cellar, it comes with a factory-default configuration. You can modify this configuration either during the initial setup or afterward. Open the Vinotag® app, select the cellar you want to modify, then click on the settings icon at the top right, and select “Information.” Once on your cellar’s page, click on “Shelves” to configure the shelves. From here, you can remove existing shelves or add additional shelves from the list of compatible ones, if space is available. You can also adjust the number of storage levels on each shelf up to a maximum of 5 levels. By default, each shelf has 1 storage level.
If you want to move an entire shelf with its bottles, press and hold the three horizontal bars to the right of the shelf you want to move. Drag it to the desired position, and the app will ask you to confirm the move of the shelf and its bottles. The bottles will retain their exact location. If you choose to move only the shelf, the bottles will automatically be placed in the storage area.
Note:
- Each shelf has 1 storage level by default. If you start stacking bottles, you must add additional storage levels in your digital cellar.
- You cannot directly place one shelf in the position of another. The level must be cleared of its shelf first. If you wish to place a shelf in another’s spot, start by freeing up the level from its initial shelf.
- From the list of wines in your cellar
Choose the wine record you wish to modify, and click either on “Bottle details” to modify the purchase price or add a comment, or click below on “Wine details” to access the wine record and modify its content.
- From my wine library
Select the record to be modified and click on “wine details” to access the wine record and modify its content.
I don’t have any more “scans”, how can I get my records pre-filled with VIVINO® ?
Vinotag® allows you to take a picture of the label of your bottle in order to create its wine file. This one can be filled manually with “TAKE A FREE PHOTO” or be pre-filled thanks to our exclusive partnership with VIVINO®. When you register, 50 “scans” are offered to you, so you get 50 pre-filled cards. Once the 50 scans are used, you can always acquire new ones by becoming Premium.
Open the Vinotag® application and go to the PROFILE tab. In order to benefit from more scans, click on “I WILL BECOME PREMIUM” then on “CHOOSE A PREMIUM OPTION”. Then choose the number of scans you need.
Please note that this option is not free.
Vinotag® allows you to take a picture of your bottle’s label in order to create its wine file. This one can be filled manually with “TAKE A FREE PHOTO” or be pre-filled thanks to our exclusive partnership with VIVINO®. When you register, 50 “scans” are offered to you, so you get 50 pre-filled cards. Once the 50 scans are used, you can always acquire new ones by becoming Premium.
Open the Vinotag® application and go to the PROFILE tab. In order to benefit from more scans, click on “I WILL BECOME PREMIUM” then on “CHOOSE A PREMIUM OPTION”. Then choose the number of scans you need.
Please note that this option is not free.
You can delete your Vinotag account at any time. To permanently delete your account, go to the tab “Profile” > “Modify my information” > “Delete my account”. Please note that the deletion of your account is irrevocable and all your data will be permanently deleted.
The Vinotag application is not suitable for managing a natural cellar or other wine storage.
The application requires the creation of a digital version of your physical cellar and cannot be used for any purpose other than the one clearly defined.
No, the Vinotag application is exclusive to the Avintage, Climadiff, La Sommelière, Temptech, Le Cellier, Vinostyle & Provintech brands. Please refer to the list of compatible wine cellars: https://vinotag-app.com/index.php/caves-comptatibles-vinotag/. Any other brand of wine cellar cannot be managed with the Vinotag application.
The Vinotag application offers you the possibility of exporting all the data from your digital cellar into an Excel file. This file will give you the possibility of generating statistics and having an overview of your cellar.
Export the contents of your digital cellar to Excel by going to the settings section of your digital wine cellar then clicking on “Export”.
You can customize your digital cellar’s interior configuration when you add accessories to your actual wine cellar. This feature is also useful if you want to manage bottles across more than one row. Digital shelves offer 1 storage level by default. If you stack bottles, you need to customize your shelf and add storage levels to reflect your actual organization.
To add or remove a shelf, go to the digital wine cellar view, click on the settings icon at the top right, then on “Information” and “Shelves.”
When your wine cellar is equipped with an active carbon filter, you can receive an alert (in the form of a pop-up) to inform you when it is necessary to change the active carbon filter. It is recommended to change the cellar filter annually. If when you open your Vinotag application you see the charcoal filter change pop-up, replace the filter in your physical cellar and go to MY CELLAR – SETTINGS – MAINTENANCE and click on “Filter changed on” then “Yes”, the current date is automatically registered. This action is necessary to ensure the correct recall of the alert. The alert is renewed one year after the “filter changed” date provided. Remember to check the compatibility of the carbon filter with your wine cellar before your purchase, we recommend that you purchase the filter on the brand’s website to avoid compatibility errors.
By default, each shelf is shown with one row of bottles. Depending on your wine cellar’s storage plan and capacity, the shelf can be customized.
To adjust the storage capacity of a shelf (storage levels only), open the Vinotag® app, select the cellar you want to modify, click on the settings icon at the top right, and then on “Information.” From the cellar page, click on “Shelves” to configure your shelves.
A pencil icon will appear next to the default number of levels. Click on it to open a pop-up where you can set the number of storage levels (rows of bottles) for each shelf.
When your digital wine cellar is created, shelf names are automatically generated, numbered in ascending order from the top to the bottom of the cellar.
You can rename shelves based on your preference or the type of wines stored, which can help organize your cellar.
To rename a shelf, from the “CELLAR” or “SHELVES” page, simply click on the pencil icon next to the current shelf title. This opens a pop-up where you can rename the shelf as desired.
To check, go to your phone’s Wi-Fi settings and select a network that is often called “2.4G” or without the word “5G”. If you only see one network, it may be that your box automatically combines the two frequencies (in which case you’ll need to temporarily disable 5GHz in the box settings).
It’s also possible that your box doesn’t offer 5Ghz, in which case you can connect your wine cellar as normal.